
You will learn how to create a process with Iterop.
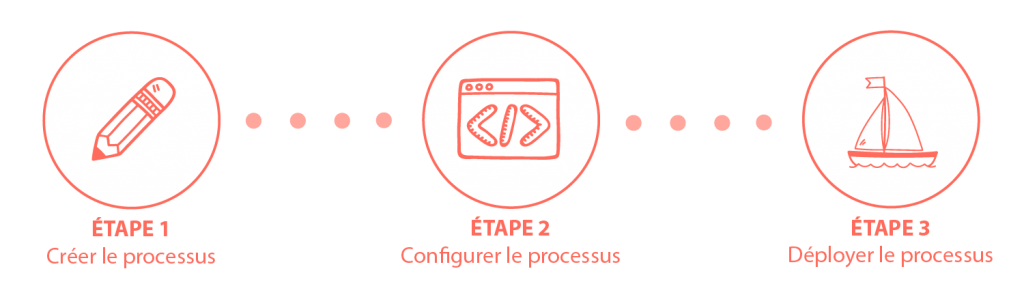
What you’re going to do in this tutorial:
- Modeling a process with the Iterop modeler
- Configuring a process with IteropDesign
- Launch a process with IteropPlay
Before you start
To help you follow the tutorial easily, here are a few things you should know before you start:
- Check the validity of your access to Iterop : you must have received an email containing your login and password
- Consult the documentation: to help you better locate the different menus and buttons that you will navigate through this tutorial, consult the following sections:
- The IteropPlay interface
- The IteropDesign interface Use the browser Google Chrome to model your process.
Here is the process you will go through

The boxes used in this tutorial :
The tutorial process
This process includes several tasks that, through their sequencing, allow for the efficient management of a customer claim from its receipt to its processing and the automatic sending of a processing notification to the customer.
We have thought about the logic of our process and established the tasks (actions to be carried out) necessary for its proper functioning. We have defined a set of 4 tasks.
- The first task is the receipt by the service department of a customer complaint and the analysis of the complaint.
- Following the analysis, if information is missing, the customer must be contacted again to retrieve this information and then return to the claim analysis. This loop can be performed as many times as necessary until the desired information is obtained.
- If there is no missing information or if the customer has already been contacted again, the claim must be processed.
- Finally, the last task to be performed after the “Complaint processing” customer corresponds to a service task allowing the automatic sending of an email informing the customer that his complaint has been processed.
Iterop’s interfaces
Iterop Design
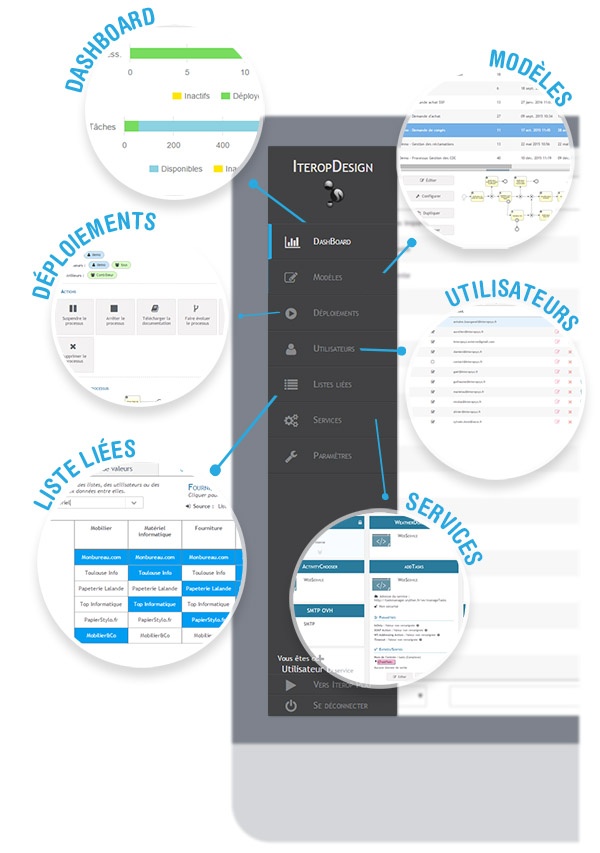
Iterop Play
Step 1: Creation and modeling
Create a first model
The models correspond to the drafts of your processes. These are the versions that you will modify, deploy and improve and then make available to your teams.
- At your first connection you arrive on the IteropPlay interface. To switch to Iterop Design and start modeling your first process, click on the tab “To Iterop Design”.
- Once on your Iterop Design interface, create a new template by clicking on the button on the right of the window
- Name your template “Customer Complaint Handling” customer” and click on Create a new template
Discovery of the modeler

1️⃣ The drawing area: this is where you draw the process. By default, a start-event is automatically created.
2️⃣ BPMN elements: these are the elements of the BPMN language that you can drag and drop into the drawing area. You can also feed the process as you go along with the left-click of the mouse.
3️⃣ The action bar : it allows you to save your model, to delete, copy, paste, cut elements…
4️⃣ The configuration button : once your process is complete, click on this button to reach
Model your first process
See the modeling in video
The steps of the modeling
- The start event is already present on the drawing area.
- Add your first condition that will allow us to complete our future loop. It is in the form of a diamond and is called logic door.

- Then add the first user task to be performed and name it : Analyzing the customer complaint . This is a user task because it is performed by a member of the customer service department.
- Add a second logical gate after the first task.
- Make your first loop by adding a new user task Contact client after the second logical gate . Add this new task, above “Analyze Customer Claim”, the sequence flow will automatically form a right angle.
- Then select the sequence stream on the task Contact Client and drag it to Gate 1. Once colored green, release the left click to connect the task and the logic gate.
- Add a new user task following logic gate 2. Name the task Process the claim.
- It is now necessary to finalize the process by integrating a last service task: Send notification to customer, it will inform the customer that his complaint has been processed.
- Add a Simple End Event to finalize the process.
You have completed the first step of creating and graphically modeling your first process.
Let’s move on to the second step.
Step 2: Process Configuration and Task Assignment
Configuring the process
You modeled your process. Now you have to configure the process and assign the different tasks to the users.
See the configuration in video
- In the configuration interface, here is the status of your first process:
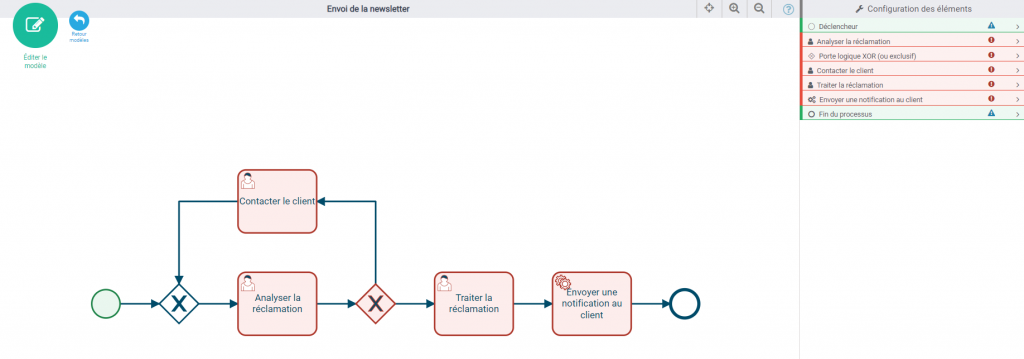
On the graph, the elements circled in red mean that they are not configured, those in green mean that they are.
For process configuration, you will use the drop-down menu on the right side of the diagram.
1- Configure the start of the process
The “trigger” is used to configure the data needed to start the process.
- Click on Trigger
- Then press the Configure Form button.
- Here is the form configuration window :
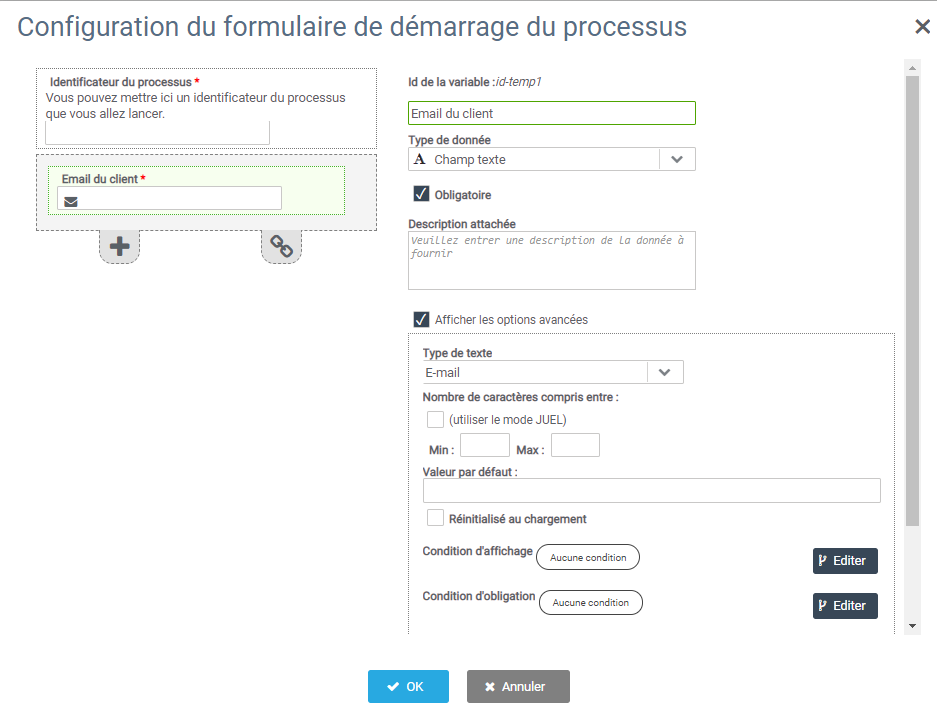
In the left part In the left part : you have to add the data you want to see in the start form (Name, email, phone…).
Configuring the process identifier
The “process identifier” variable is always displayed by default in all forms for starting a process.
An identifier corresponds to the name of each instance launched.
For example, the identifier may be the name of the customer associated with the claim. This allows to identify the different launches in the same process.
To set up the form
Click on the icon ➕ to add a data and fill the right part of the screen with the following elements:
|
Data Name
|
Type of data
|
Mandatory?
|
Description
|
Advanced options
|
|---|---|---|---|---|
| Name of the client | Text field | Yes | Name of the customer associated with the claim. | / |
| Customer’s email | Text field | Yes | Please enter the email address of the customer making the complaint. | |
| Date of claim | Date | Yes | Date of receipt of the complaint. | Date format: 01/01/2013 |
| Description of the claim | Text block | Yes | Please enter the subject of the complaint precisely. | / |
Your form should now look like this:
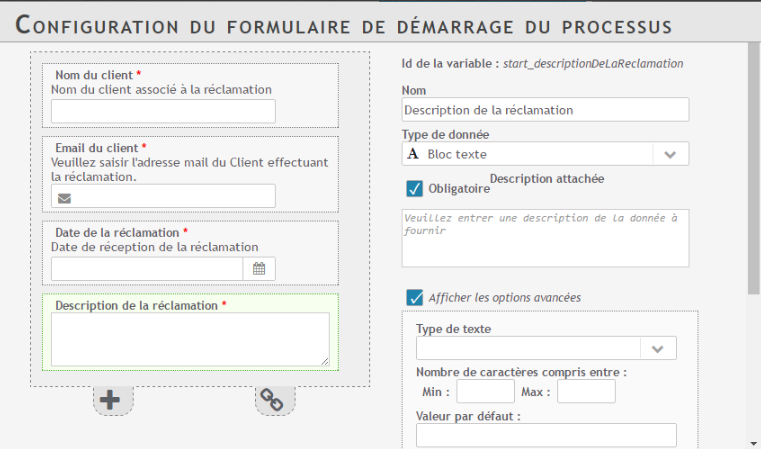
Then click on OK to validate the configuration.
You have completed the configuration of the start form.
2 – Configure the task “Analyze customer complaint”.
- Click on Analyze Customer Claim in the right menu
- In the Assignments section, click Assign
- Choose Dynamic assignment and task actor = Process initiator.
4. Select Select data in Information to be displayed.
5. Complete the data by following the 2 following tables:
|
General information |
Mail Notification |
Assignments |
Information to display |
|
Analyze the customer complaint Description: Please complete the requested information. |
No |
Dynamic Assignment : Process initiator |
– Name of the client – Customer’s email – Date of claim |
To configure the :
- Once the information is completed, go to Form and click onEdit
- Click on the icon ➕ to add a data and fill the right part of the screen with the following elements:
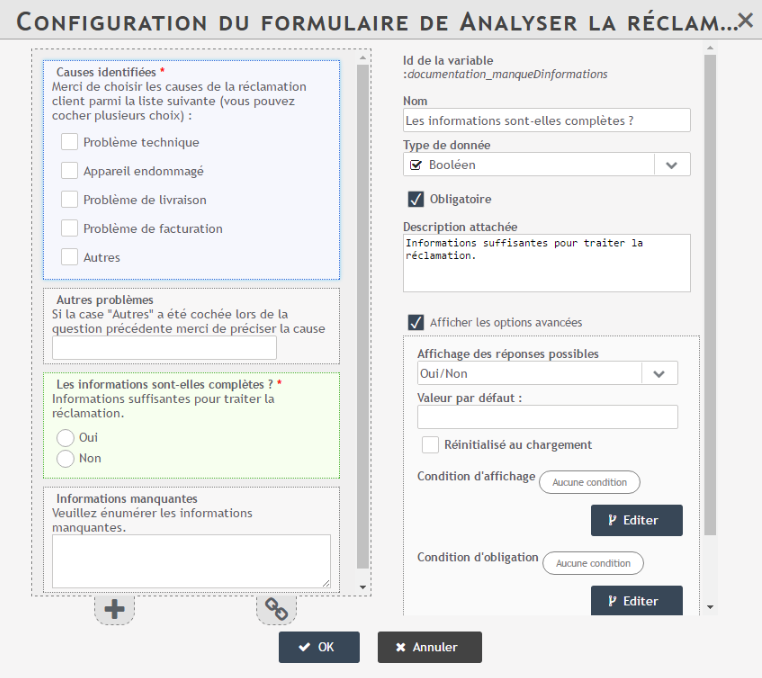
Your form should look like this:
|
Data Name |
Type of data |
Mandatory? |
Description |
Type of values |
Possible values |
|
Other issues |
Text field |
No |
If the box “Other” has been ticked in the previous question, please specify the cause. |
/ |
/ |
|
Identified causes |
List of values |
Yes |
Please choose the causes of the customer complaint from the following list (you can tick more than one choice): |
Custom List |
– Technical Problem – Damaged apparatus – Delivery problem – Billing problem – Others |
|
Missing Information |
Text block |
No |
Please list the missing information. |
/ |
/ |
|
Is the information complete? |
Booleen: This type of variable can only take 2 values. For example: Yes/No, True/False… |
Yes |
Sufficient information to process the claim. |
/ |
/ |
Validate the configuration of the form. You have finished configuring the task Analyzing Customer Claim.
OPTION : Create a field with dynamic display
You can very well make the display of the variable “Missing information” dynamic. If the information is complete, this field is useless.
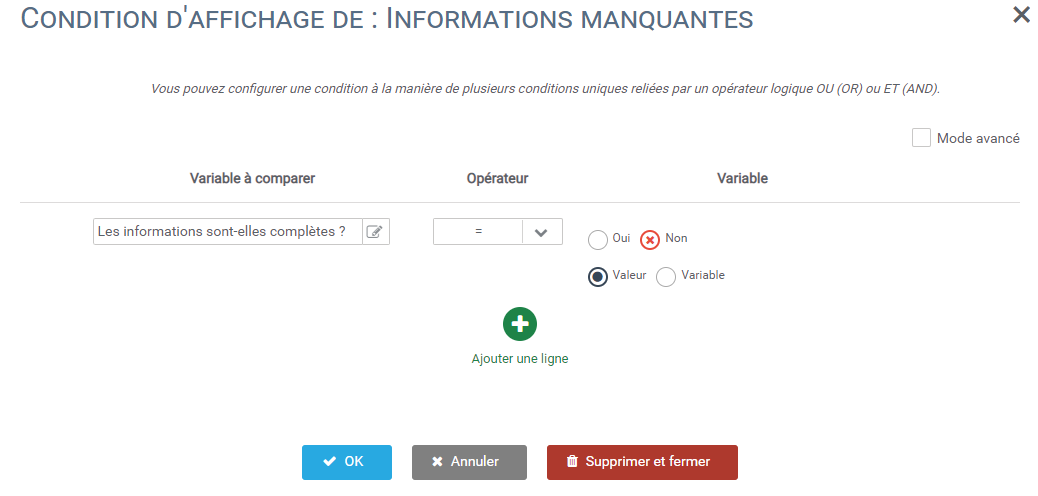
- Click on the variable “missing information” in the form
- Select the advanced options and go to the display conditions.
- On the same principle as the logical gate configuration, we will compare two variables. Here, the field will only be displayed if the information is incomplete (Complete information = No)
3 – Configuring the logic gate
This door will allow us to define the conditions and to know, according to the information that the After-Sales Service Department has, whether to process the complaint or to contact the customer.
To configure the logic gate, we need to define the conditions we are interested in.
Condition to “Contact the customer”
If the information provided is incomplete, the customer must be contacted again and therefore the task “Contact Customer” must be started.
- In the Edit Conditions panel, Condition to: Contact Client and click Edit Condition.
- Complete the information as follows:
|
Variable to be compared |
Operator |
Check “Value” |
|---|---|---|
| Analyze the customer complaint : Is the information complete? (Booleen) | = | No |
Condition to “process the claim”
If the information provided is complete, the task “Process Claim” can be started.
- Go to the Edit Conditions panel, Condition to: Edit Claim and click Edit Condition.
- Complete the information as follows:
|
Variable to be compared |
Operator |
Check “Value” |
|---|---|---|
| Analyze the customer complaint : Is the information complete? (Booleen) | = | Yes |
Click on OK. Configration is complete.
4 – Configuring the “Contact Client” task
Information to be displayed :
|
General information |
Mail Notification |
Assignments |
Information to display |
|
Contact the customer Description: Please contact this customer to retrieve the missing information. |
No |
Dynamic Assignment : Process initiator |
Client’s Name Identified Causes Other Problems Is the information complete? |
To set up the :
Click on the icon ➕ to add a data and fill the right part of the screen with the following elements:
|
Data Name
|
Type of data
|
Mandatory?
|
Description
|
Advanced options
|
|---|---|---|---|---|
| Further information | Rich text | No | Please enter the information collected. | / |
Your form should now look like this:
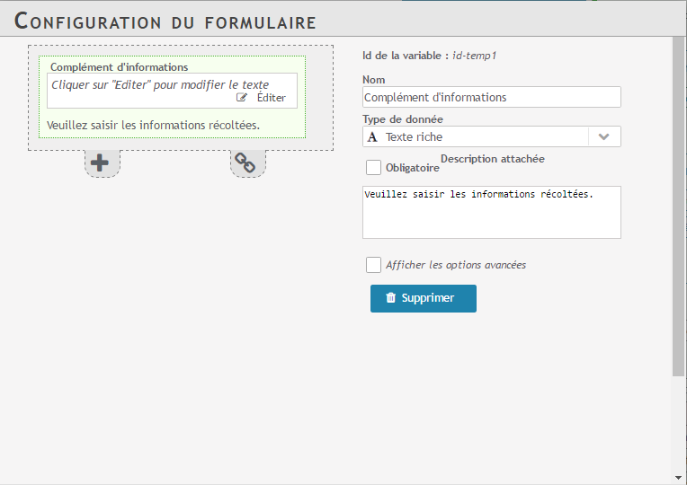
Click on OK.
5 – Configuring the “Process claim” task
Information to be displayed :
|
General information |
Mail Notification |
Assignments |
Information to display |
|
Process the customer complaint Description: Please process the associated customer complaint. |
No |
Dynamic Assignment : Process initiator |
-Client’s Name -Identified Causes -Other Problems -Further information |
To set up the :
Click on the icon ➕ to add a data and fill the right part of the screen with the following elements:
Your form should now look like this:

Click on OK.
6 – Configure the task “Send a notification to the client”.
This is your first automatic task. It is not necessary to enter a description, as the task is performed automatically and without human intervention.
Information to be displayed :
- In the Select Service panel, click Select Service.
- Select “Mail, Internal SMTP” and click OK.
- In the Service Entry Data panel, click Select Data.
- Configure the mail with the following fields :
|
Field type |
Data (drag from left to right) |
Format (Click on the data then on Configure) |
Text |
|
Body |
Name of the client Actions taken Other Actions |
JUEL |
Write on the right hand side; “Hello [cliquez sur la variable “Nom du client” pour l’insérer directement], Your request has been processed successfully. We’ve taken the following action in response to your complaint: [cliquez sur les variables “Actions effectuées” et “Autres actions” pour les insérer directement].” |
|
Subject |
/ |
FIXED |
Write “Processing of your claim completed.” |
|
À |
Customer’s email |
/ |
The email will be sent directly to the email address entered at the start of the process. |
Here’s what your screen should look like:
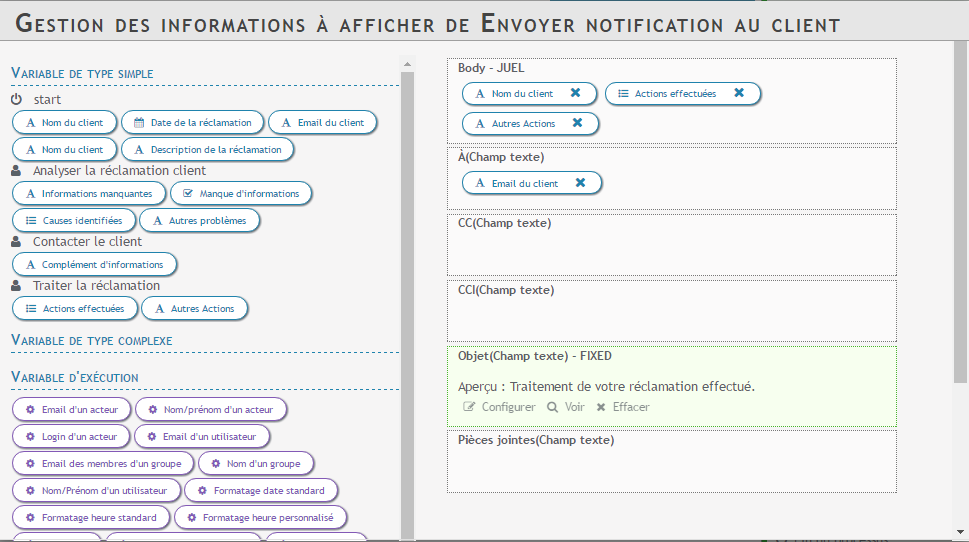
Click OK to complete the configuration.
The part “End of process” will allow us to configure the output variables of the process. That is to say, the information that one potentially wants to extract or save for later follow-up.
To configure the key process data, click Select Data. For example, you can choose to keep the following data:
- Client’s Name
- Customer’s Email Address
- Identified causes
- Other issues
- Actions taken
- Other Actions
BRAVO!
The process is now fully configured and ready for deployment.
You will now be able to test your process in Iterop Play.
Step 3: Putting the process into production
Deploy your model
Once the configuration is complete your process is still in the template state, this one corresponds to a draft state and means that the process is not yet deployed.
- In the configuration interface, click on the button Return templates ⬅ to return to your template manager
- You arrive in the interface dedicated to the management of your model with on the right, several icons :
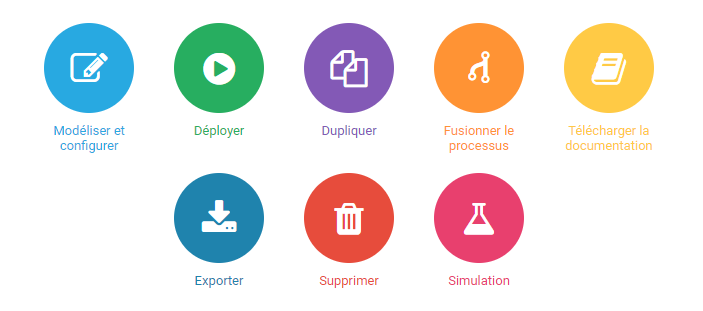
3. Click on Deploy
Your process is now in production! However, your teams still need to have the necessary rights to start the process.
Assign roles
Once your templates have been deployed, they appear in the Deployments tab in the left menu. It is in this interface that you can manage all processes in production.
You have the option of defining several assignment levels:
- Click on the Deployments tab and choose “Customer Complaint Handling”. In the right window select the Roles. panel.
- To test the process, assign yourself as “Initiator” and as “Controller”, so you will be able to start and monitor the process.
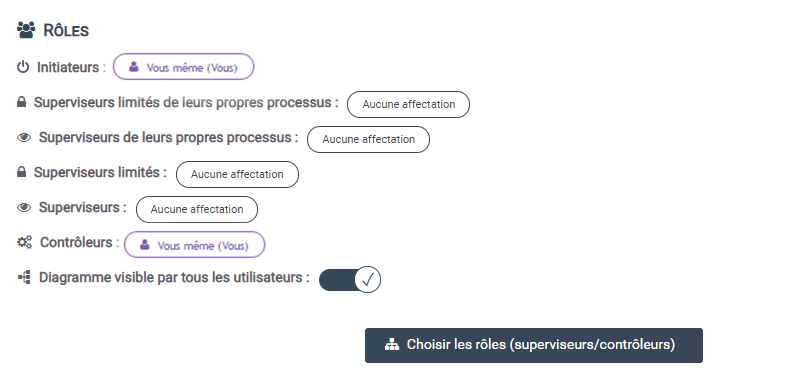
The initiator can start a process. He does not have a vision of the processes he is initiating.
Controller views all processes on which it is controller. It also has an interface that allows you to see the tasks that have been declared in error by the actors. It can change the value of the output variables of a process task at any time. It can also force or delete the assignment of a task for a given actor. In addition, the controller can stop a process at any time.
Test the process
You will now test your claims handling process in IteropPlay.
- Select the tab To IteropPlay in the left menu
- Click on the tab Process and start “Customer Complaint Handling” by clicking New
- Fill in the form and click on Start Process.
- Select the tab Tasks in the left menu, a new task has appeared in your task manager.
Performing a task
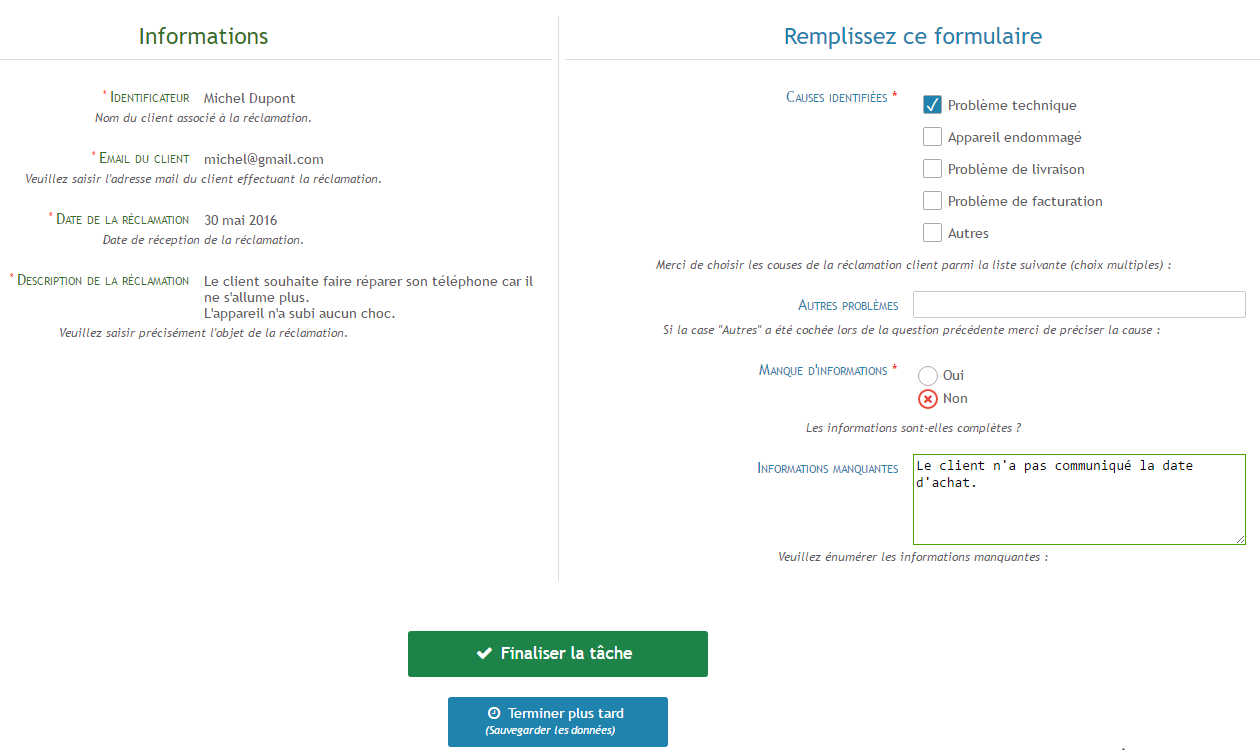
- Click on the task “Analyze customer complaint”. This task will be carried out by the service department.
- The following window opens, fill in the parts as follows and complete the task :
3. Click on the new task “Contact Client” in your manager.
This task consists of contacting the customer for further information. It will be carried out by the sales department.
Fill in the missing information and complete the task.
Now you have all the information to process the customer’s complaint.
Testing notifications
To test the automatic notifications dedicated to the client, you must enter your personal email address in the field . “Client email” when the process is initiated. This will allow you to test the notifications.
- Go back to your manager and finalize the task “Analyze Customer Claim”.
- The new task “Process Claim” appears, select it and choose to perform a “Exchange”.
- You are finished, the customer will be automatically informed of the processing of his claim.
Evolving the process
Adaptation of a process allows a process already deployed to be put back in model state so that it can be modified and redeployed later, without interrupting processes already running.
To make your process evolve:
- Rendezvous Design and select your process in deployments
- In the right pane, choose Actions and click on the icon ? “Make the process evolve”
The process will be duplicated in the tab “Mtemplates”. The initial version present in “Deployments” continues to be usable while the duplicated version returns to the model state in a version 2.
When the modification is completed and the new modified model is deployed, it replaces its initial version in the page “Deployments”.
The version numbers of the different processes are visible on the pages “Mtemplates” and “Deployments” in the column Version.
The list of available actions :
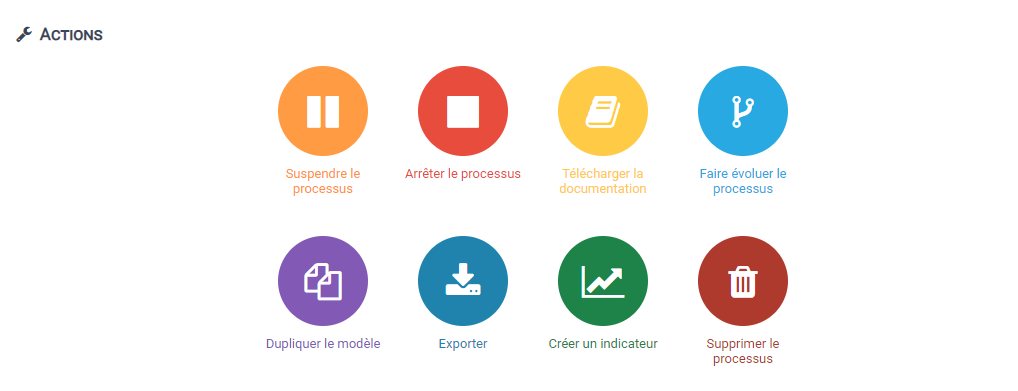
- Pause : this means that no new instances can be started for this process but the already started instances continue to live until their end.
- Stop the process: cit means that the whole process and its instances are stopped, no new instances can be started and the already started instances are stopped too.
- Download documentation: this action automatically generates a PDF with the process diagram, the actors, the tasks and all the variables that pass through the process.
- Duplicate template : this will create a copy of the process which will be accessible via the Templates tab.
- Export : this allows you to export the process diagram in .iterop or .bpmn format.
- Create an indicator: once your process is in production, you can define custom indicators for the whole process. The possibilities are almost endless.
- Delete process: This will delete all running executions for this process and all templates for this process with associated versions.

