
Welcome
Welcome to our fabulous process management application. This documentation will help you to understand Iterop’s different interfaces and allow you to easily create new processes, configure them and automate your flows.
To get started on Iterop, we invite you to read this page in order to acquire all the basic knowledge.
Before you start
Before you start, here are some things you should know about Iterop:
- Iterop is a online application that works with most web browsers, which means you don’t need to download or install any software on your computer.
- It is important to note that when you create an Iterop account, you agree to respect our terms and conditions of use.
- In terms of resource materials, we provide case studies, videos as well as our online blog.
Login
For your first connection, there are two possibilities:
- Either you have applied to iterop yourself, in which case you have access to a dedicated instance with a personalized URL. Go to your emails and click on the URL sent by our team, you should see this window appear
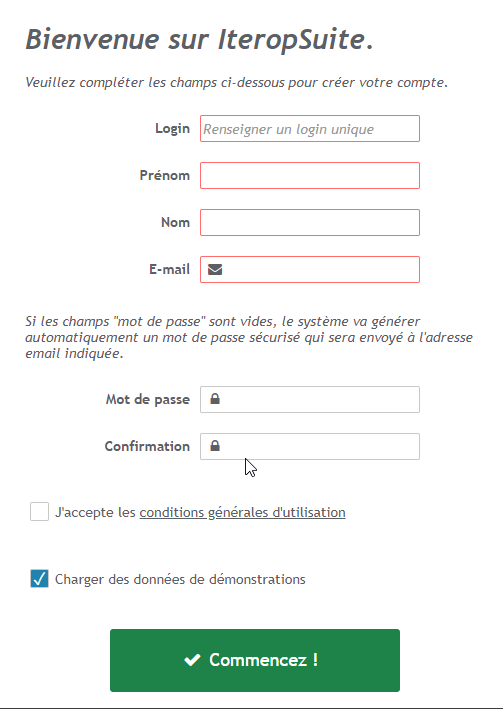
Fill in the requested information and accept the general terms and conditions of use.
- Either or you are a user of the solution , in this case your identifiers have been sent to you by email via your Iterop referrer.
Once you have retrieved your identifiers, enter your information on the login page:
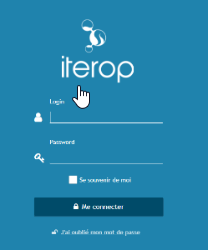
To avoid entering your password at each visit, you can check the box “remember me” to save your identifiers.
Change general settings
You are now connected to Iterop. You can discover in detail the different interfaces of the application.
As a reminder, the IteropPlay part is dedicated to the actors of the company having a role in the deployed processes. In this interface, you perform the tasks assigned to you and follow the status of the current processes (according to the user rights you have been assigned).
To change the settings of your space, go to the main menu on the left and click on “Settings”. In this part of the application, you can :
- Change your password
- Change language : French / English
- Delegate your account to an employee
- Enable tooltips (valuable guide to get started in Iterop)
Choose the options that interest you and return to the main part by clicking on the tab “Dashboard”.
User rights management
In Iterop, you have the possibility to manage your users easily and to define their role precisely.
A first step is to define the roles within the application:
- Administrator : he is an expert in BPMN and knows how to connect to webservices (access to Desing/Play)
- Designer : it creates the different processes and controls the BPMN (access to Desing/Play)
- User : he uses the application on a daily basis to manage his tasks (access to Play)
Once the roles within Iterop are defined, you will start creating your processes and assign visibility rights to each actor.
For example, some actors can only start a process, they are the initiators (they can also be external to the company). Other teams may, for example, track processes HR or only the processes to which they are assigned, then they are supervisors or supervisors of their processes.
Find out everything you need to know about user roles in a nutshell:
Adding a user and assigning roles
We advise you to create users before you start modeling your processes. This will allow you to assign roles directly when configuring your processes.
If you have the necessary rights, go to Iterop Design and click on the tab “Users”. Then click on “Add User” in the upper right corner.
To learn all about creating users, go to add a user.
Create a process
It’s time to create your first process. Here is a short video that explains how to design a document validation process.
- Connect to Iterop
- Go to Iterop Design by clicking on the tab “To Iterop Desgin” in the menu on the left side of the page
- Click on “Create a new template” : a template corresponds to a first template which will then be improved through the different versions of the process.
- Choose the name of your process and open the modeler.
- Model your process and record
It is now accessible in the tab “templates”.
Setting up a form
Forms allow to create simple user interfaces that gather all the data needed to perform the tasks.
After modeling your process and clicking on save, you are redirected to IteropDesign in the Configuration interface. In IteropDesign, on the right column, you have access to all the configuration data. One of the first steps is to configure the form to start the process. That is, the form that will be displayed when users launch the process.
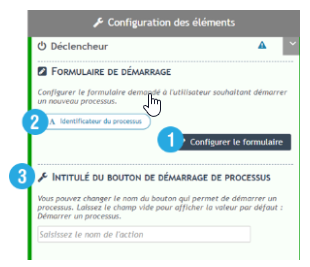
1️⃣ The button “Configure a form” gives you access to the configuration of the data to display
2️⃣ The labels corresponding to the data you have configured
3️⃣ Allows you to define the title of the button when launching the “Validate the request”, “Save the order” … process.
Here is an overview of the configuration system:
All forms run on the same configuration system.
- Just click on the button + to add a field. On the right-hand side, you define the field name, type and advanced options. See all data types available in forms.
- Click OK to validate.
Learn more about form setup.
Go further
You now have all the knowledge you need to take Iterop in hand and automate your first workflow.
If you wish to go further in
- Beginner’s Tutorial : Create a first process in 10 minutes
- Connect your webservices
- Create a key indicator
- Create dashboards

